IoT Weather Station using Arduino, ESP8266 and Thingspeak
- Yan Shin Aung
- Feb 19, 2020
- 3 min read

How it works
Here is an example program of Arduino IoT using ESP8266 Wireless Module –it sends data received from sensors including DHT11 ( Humidity and temperature ),Raindrop Sensor and Moisture Sensor which can be monitored from anywhere by utilizing the free IOT service provider -ThingSpeak.
Components Required
1. Arduino Uno
2. ESP8266 Wi-Fi Shield
3. DHT11 Sensor
4. Raindrop Sensor
5. Moisture Sensor
6. Resistors
7. Some jumper wires
What is IoT?
At the very beginning we have to answer the question What does IoT mean? What is IoT? The phrase "Internet of Things" has been used for the first time in 1999 by
Kevin Ashton - an RFID expert.
IoT is commonly understood as the network of smart sensors. IEEE definition is a network of items - each embedded with sensors - which are connected to the Internet. Some other definitions of IoT is the network that connects different bigger and smaller elements of variety of functions: sensors, switches, actuators as lights, motors, heaters, pumps – THINGS .
First sensors converts the signals from physical world to the digital form generating the data. Data stream is sent through the network, and utilizing specialized network equipment like routers and gateways. It is delivered to the IoT broker and further to the database or cloud for storage and analyzing.
The ESP8266 is a low cost Wi-Fi Microchip,with a full TCP/IP stack and microcontroller capability.
The DHT11 is a basic ,ultra low-cost digital temperature and humidity sensor.It uses a capacitive humidity sensor and a thermistor to measure the surrounding air, and spits out a digital signal on the data pin (no analog input pins needed).It’s fairly simple to use.
About ThingSpeak

ThingSpeak is an IoT analytics platform service that allows us to aggregate, visualize and analyze live data streams in the cloud. ThingSpeak provides instant visualizations of data posted by our devices to ThingSpeak. Thingspeak is often used for prototyping and proof of concept IoT systems that require analytics. Only weakness is that we have to wait about twenty seconds while transferring data from device to cloud and vice versa when using free.
STEP 1 : Setting Thingspeak
1. First Create an account at https://thingspeak.com/users/sign_up
After Sign in,
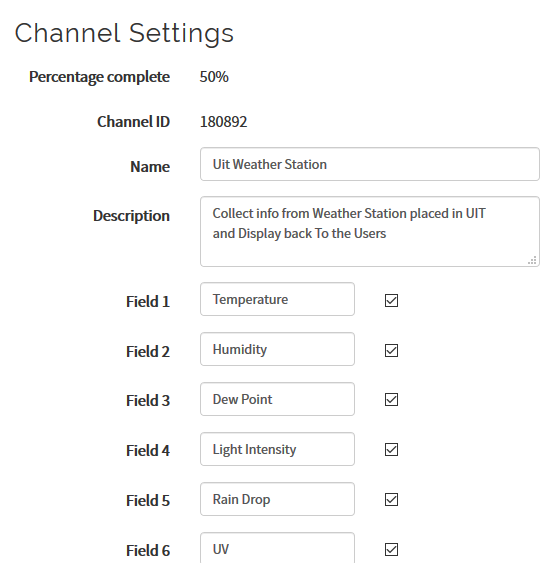
2. In Channel Setting, create a channel .
We opened 5 fields because we are going to upload 5 sensor values.

Notes : API Keys Settings
Write API Key: Use this key to write data to a channel. If you feel your key has been compromised, click Generate New Write API Key. Read API Keys: Use this key to allow other people to view your private channel feeds and charts. Click Generate New Read API Key to generate an additional read key for the channel. Note: Use this field to enter information about channel read keys. For example, add notes to keep track of users with access to your channel.
It is enough to fill Name and fields in the setting , then save.
Mark your Channel ID , ReadAPI Keys and Write API Keys ( you will need that later )
STEP 2 : CircuitDiagram

Pin Connections
RXD = Digital Pin 3
TXD = Digital Pin 2
GND = GND
VCC = 3.3V
RST= 3.3V (with 10k ohm)
CH_PD = 3.3V (with 10k ohm)
STEP 3 : The Code
String myAPIkey = "YZTISH8WSAR3EZJQ"; //your thingspeaks channel Write API Key
#include <SoftwareSerial.h>
#include <DHT.h>;
SoftwareSerial ESP8266(2, 3); // Rx, Tx
/* DHT SENSOR SETUP */
#define DHTTYPE DHT11
#define DHTPIN 8
DHT dht(DHTPIN, DHTTYPE,11);
float humidity, temp_f;
float x,y,z;
long writingTimer = 17;
long startTime = 0;
long waitTime = 0;
const int sensorMin = 0;
const int sensorMax = 1024;
boolean relay1_st = false;
boolean relay2_st = false;
unsigned char check_connection=0;
unsigned char times_check=0;
boolean error;
void setup()
{
pinMode(A0,INPUT);
pinMode(A1,INPUT);
pinMode(A2,INPUT);
Serial.begin(9600);
ESP8266.begin(9600);
dht.begin();
startTime = millis();
ESP8266.println("AT+RST");
delay(2000);
Serial.println("Connecting to Wifi");
while(check_connection==0)
{
Serial.print(".");
ESP8266.print("AT+CWJAP=\"Jason\",\"12345678\"\r\n"); /*Here SSID and Password have to edit ( Jason and 12345678*/
ESP8266.setTimeout(5000);
if(ESP8266.find("WIFI CONNECTED\r\n")==1)
{
Serial.println("WIFI CONNECTED");
break;
}
times_check++;
if(times_check>3)
{
times_check=0;
Serial.println("Trying to Reconnect..");
}
}
}
void loop()
{
waitTime = millis()-startTime;
if (waitTime > (writingTimer*1000))
{
readSensors();
writeThingSpeak();
startTime = millis();
}
}
void readSensors(void)
{
x=analogRead(A0);
Serial.println(x);
y=analogRead(A1);
Serial.println(y);
z=analogRead(A2);
Serial.println(z);
temp_f = dht.readTemperature();
humidity = dht.readHumidity();
}
void writeThingSpeak(void)
{
startThingSpeakCmd();
// preparacao da string GET
String getStr = "GET /update?api_key=";
getStr += myAPIkey;
getStr +="&field1=";
getStr += String(temp_f);
getStr +="&field2=";
getStr += String(humidity);
getStr +="&field3=";
getStr += String(x);
getStr +="&field4=";
getStr += String(y);
getStr +="&field5=";
getStr += String(z);
getStr += "\r\n\r\n";
GetThingspeakcmd(getStr);
}
void startThingSpeakCmd(void)
{
ESP8266.flush();
String cmd = "AT+CIPSTART=\"TCP\",\"";
cmd += "184.106.153.149"; // api.thingspeak.com IP address
cmd += "\",80";
ESP8266.println(cmd);
Serial.print("Start Commands: ");
Serial.println(cmd);
if(ESP8266.find("Error"))
{
Serial.println("AT+CIPSTART error");
return;
}
}
String GetThingspeakcmd(String getStr)
{
String cmd = "AT+CIPSEND=";
cmd += String(getStr.length());
ESP8266.println(cmd);
Serial.println(cmd);
if(ESP8266.find(">"))
{
ESP8266.print(getStr);
Serial.println(getStr);
delay(500);
String messageBody = "";
while (ESP8266.available())
{
String line = ESP8266.readStringUntil('\n');
if (line.length() == 1)
{
messageBody = ESP8266.readStringUntil('\n');
}
}
Serial.print("MessageBody received: ");
Serial.println(messageBody);
return messageBody;
}
else
{
ESP8266.println("AT+CIPCLOSE");
Serial.println("AT+CIPCLOSE");
}
}
STEP 5 : IoT Widget Installation
After uploading sketch, you can trace the data communication between esp8266 and thingspeak server via serial monitor.
Open Serial Monitor ( which may restart your Arduino ).
After that
Install thingspeak widget from
then get the thingspeak widget from phone widgets.

You can see the widget in the screen.
Open the tab in the upper right corner ,
Fill the Channel ID , Read API Key and choose the field that you want to monitor .

You can also aggregate, visualize and analyze live data streams in the website too .

This project is made by Min Khant Saw Myat Htun .


Comments